
Crochet Pattern & Guide · For dogs
Siberian Husky Dog Crochet Pattern Free: Step-by-Step Amigurumi Guide
Looking for a dog crochet pattern free? Make this adorable Siberian Husky amigurumi dog with our complete step-by-step written pattern. Features pointed ears, cheek mask, blue eyes, and curled tail.

Looking for a comprehensive dog crochet pattern free guide? This official step-by-step visual pattern walks you through crocheting a handmade Siberian Husky amigurumi dog from sitting base to perky pointed ears. Engineered with iconic Arctic canine markings — a charcoal coat, soft white chest blaze, wide cheek mask, bright blue eyes, and a sickle-curled tail — your finished seated plush stands approximately 25 cm (10 inches) tall.
Whether you are learning how to crochet animals or adding to your handmade collection of crochet stuffed animals and crochet amigurumi animals, this written guide includes every counted round, stitch repeats, and color-change notation directly from the official 26-page visual edition. If you want an ad-free, printable PDF with high-resolution photo tutorials and row checkboxes, the digital edition is available on Etsy in 5 languages (English, German, French, Spanish, and Italian).
Project Overview & Sizing Specifications
| Finished Height | Approx. 25 cm (10 inches) seated from tabletop to ear tips |
| Skill Level | Intermediate (continuous spiral rounds, multi-color tapestry blocks, piece seaming) |
| Crochet Terminology | US Standard Crochet Terms |
| Gauge Reference | 22 sc × 24 rounds = 10 × 10 cm (4 × 4 in) with 3.25 mm hook. A tight tension ensures fiberfill stuffing remains completely hidden. |
| Construction Method | Joined unturned rounds for body & head (keeps color blocks centered); turned rows for ears; spiral rounds for muzzle, limbs & tail. |
Materials & Essential Tool Kit
Tools & Fiber Requirements

- Yarn: Smooth, lightly fuzzy worsted weight / Medium Category #4 (approx. 170 m / 185 yd per 100 g skein):
- Charcoal / Dark Gray (C): Approx. 90 g / 153 m (body back, outer head, outer ears, tail outer curl).
- White (W): Approx. 65 g / 110 m (chest blaze, cheek mask, muzzle, front/back paws, inner ears, tail tip).
- Medium Gray (G): Approx. 25 g / 43 m (facial transition shading, upper front legs, inner tail curl).
- Crochet Hook: 3.25 mm (US size D/3). If you crochet loosely, drop to a 3.0 mm hook so the stitches stay tight and dense.
- Safety Eyes: Two 14 mm blue-gray plastic safety eyes with secure locking back washers.
- Safety Nose / Embroidery: One 15 mm textured black safety nose (or black embroidery floss).
- Stuffing: 60–90 g high-loft polyester fiberfill.
- Notions: Tapestry needle / yarn needle, removable locking stitch markers, straight positioning pins, sharp scissors.
Crochet Abbreviations & Stitch Glossary (US Terms)
| Abbr. | Stitch Description | How to Work It |
|---|---|---|
| MR | Magic Ring | Adjustable loop; work initial stitches into ring and pull tail firmly shut. |
| sc | Single Crochet | Insert hook, yo, pull up loop (2 loops on hook), yo, draw through both loops. |
| inc | Increase | Work 2 single crochets into the same stitch. |
| dec | Invisible Decrease | Insert hook into front loops of next 2 stitches only, yo, draw through 2 loops, yo, draw through 2 loops. |
| BLO | Back Loop Only | Work only through the back loop (the loop farthest from you) to create a ridge. |
| sl st | Slip Stitch | Insert hook, yo, draw through stitch and loop on hook. |
| ch | Chain | Yarn over and pull loop through. |
| C / G / W | Color Keys | C = Charcoal, G = Medium Gray, W = White. |
Part 1: Husky Body (Rounds 1–36 Complete)
Work from the sitting base upward in joined, unturned rounds. Sl st to the first sc and ch 1 at the end of each round; this keeps the round join straight along the center back of the body.
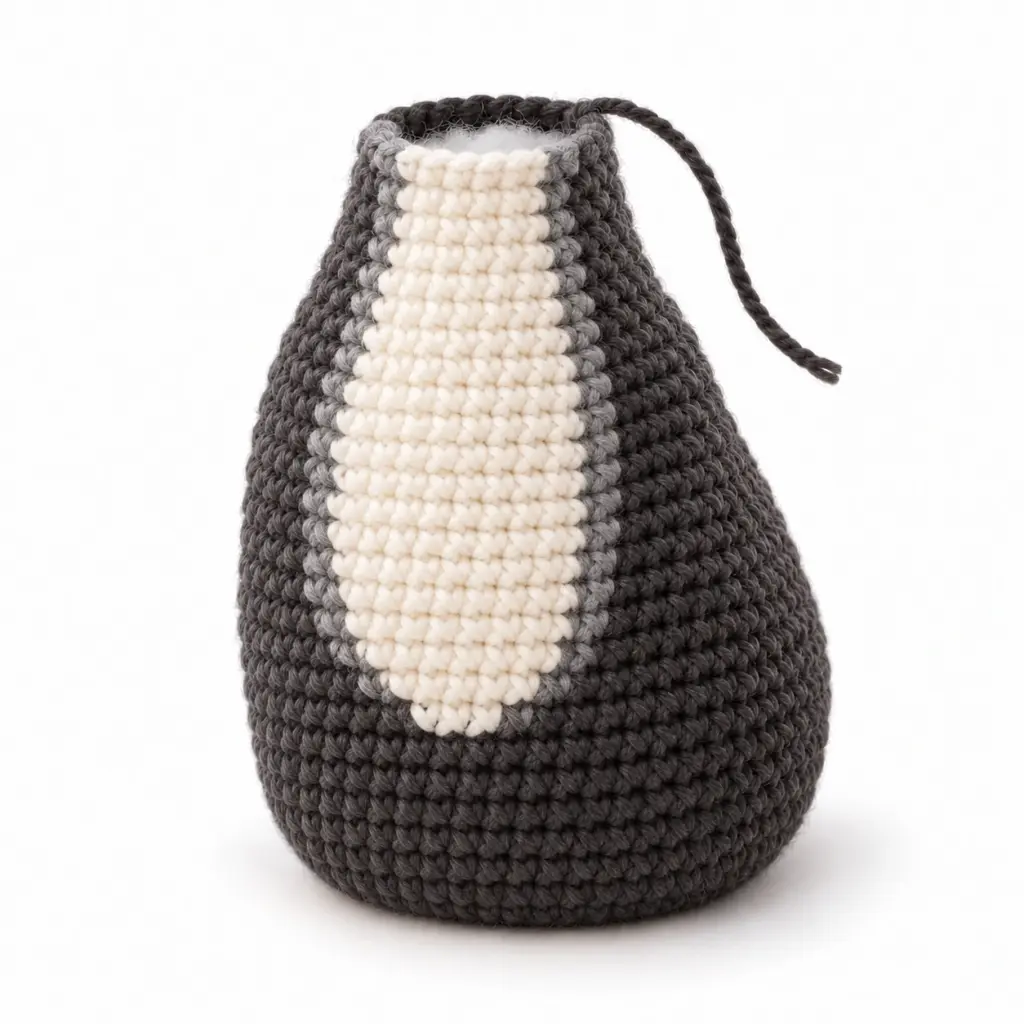
01. Build the Charcoal Base (Rounds 1–10)
- R1: In Charcoal (C), 6 sc in MR, sl st to join, ch 1. (6)
- R2: [inc] × 6, sl st, ch 1. (12)
- R3: [1 sc, inc] × 6, sl st, ch 1. (18)
- R4: [2 sc, inc] × 6, sl st, ch 1. (24)
- R5: [3 sc, inc] × 6, sl st, ch 1. (30)
- R6: [4 sc, inc] × 6, sl st, ch 1. (36)
- R7: [5 sc, inc] × 6, sl st, ch 1. (42)
- R8: [6 sc, inc] × 6, sl st, ch 1. (48)
- R9: [7 sc, inc] × 6, sl st, ch 1. (54)
- R10: [8 sc, inc] × 6, sl st, ch 1. (60) — Base reaches full width.
02. Grow the White Chest Panel (Rounds 11–22)
Read the stitch total first, then execute the exact color counts from the rear seam marker:
- R11: 60 sc (60) →
C 18 / G 8 / W 8 / G 8 / C 18 - R12: 60 sc (60) →
C 17 / G 7 / W 12 / G 7 / C 17 - R13: 60 sc (60) →
C 16 / G 6 / W 16 / G 6 / C 16 - R14: 60 sc (60) →
C 15 / G 6 / W 18 / G 6 / C 15 - R15: 60 sc (60) →
C 15 / G 6 / W 18 / G 6 / C 15 - R16: 60 sc (60) →
C 15 / G 6 / W 18 / G 6 / C 15 - R17: 60 sc (60) →
C 15 / G 6 / W 18 / G 6 / C 15 - R18: 60 sc (60) →
C 15 / G 6 / W 18 / G 6 / C 15— Add small tufts of fiberfill at the bottom base. - R19: [8 sc, dec] × 6 (54) →
C 13 / G 5 / W 18 / G 5 / C 13 - R20: 54 sc (54) →
C 13 / G 5 / W 18 / G 5 / C 13 - R21: 54 sc (54) →
C 13 / G 5 / W 18 / G 5 / C 13 - R22: 54 sc (54) →
C 13 / G 5 / W 18 / G 5 / C 13
03. Shape Shoulders & Taper Neck (Rounds 23–36)
- R23: [7 sc, dec] × 6 (48) →
C 11 / G 5 / W 16 / G 5 / C 11 - R24: 48 sc (48) →
C 11 / G 5 / W 16 / G 5 / C 11 - R25: 48 sc (48) →
C 11 / G 5 / W 16 / G 5 / C 11 - R26: 48 sc (48) →
C 11 / G 5 / W 16 / G 5 / C 11 - R27: [6 sc, dec] × 6 (42) →
C 10 / G 4 / W 14 / G 4 / C 10— Add stuffing continuously into shoulders. - R28: 42 sc (42) →
C 10 / G 4 / W 14 / G 4 / C 10 - R29: 42 sc (42) →
C 10 / G 4 / W 14 / G 4 / C 10 - R30: 42 sc (42) →
C 10 / G 4 / W 14 / G 4 / C 10 - R31: [5 sc, dec] × 6 (36) →
C 9 / G 3 / W 12 / G 3 / C 9 - R32: 36 sc (36) →
C 9 / G 3 / W 12 / G 3 / C 9 - R33: 36 sc (36) →
C 9 / G 3 / W 12 / G 3 / C 9 - R34: 36 sc (36) →
C 9 / G 3 / W 12 / G 3 / C 9 - R35: [4 sc, dec] × 6 (30) →
C 7 / G 3 / W 10 / G 3 / C 7 - R36: 30 sc (30) →
C 7 / G 3 / W 10 / G 3 / C 7
Part 2: White Muzzle (Rounds 1–6)
Work with White (W) throughout in a continuous spiral around both sides of an initial chain foundation.
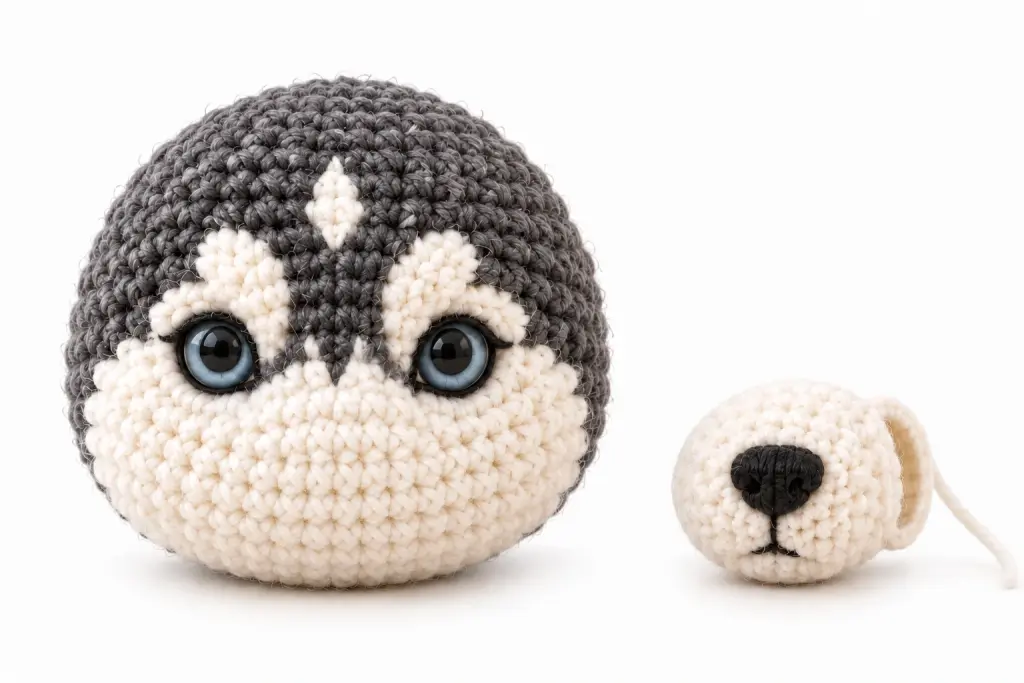
- Foundation Chain: Ch 5.
- R1: Skip 1st ch from hook, 3 sc along chain, 3 sc in last ch; rotate to underside of chain: 2 sc along underside, inc in final loop. (10)
- R2: inc, 2 sc, [inc] × 3, 2 sc, [inc] × 2. (16)
- R3: 1 sc, inc, 2 sc, [1 sc, inc] × 3, 2 sc, [1 sc, inc] × 2. (22)
- R4: 22 sc even. (22)
- R5: 22 sc even. (22)
- R6: 22 sc even. (22)
Join with sl st and fasten off leaving a 40 cm tail. Put the muzzle aside — you will need it to verify eye spacing before locking the safety eyes.
Part 3: Head & Signature Cheek Mask (Rounds 1–31 Complete)
Work from the top of the crown downward in joined, unturned rounds. The round join sits along the center back of the head.

01. Charcoal Crown & Forehead Blaze (Rounds 1–11)
- R1: In Charcoal (C), 6 sc in MR. (6) →
C 6 - R2: [inc] × 6. (12) →
C 12 - R3: [1 sc, inc] × 6. (18) →
C 18 - R4: [2 sc, inc] × 6. (24) →
C 24 - R5: [3 sc, inc] × 6. (30) →
C 30 - R6: [4 sc, inc] × 6. (36) →
C 36 - R7: [5 sc, inc] × 6 (42) →
C 20 / W 2 / C 20(White blaze begins) - R8: [6 sc, inc] × 6 (48) →
C 22 / W 4 / C 22 - R9: [7 sc, inc] × 6 (54) →
C 22 / W 3 / C 1 / W 2 / C 1 / W 3 / C 22 - R10: [8 sc, inc] × 6 (60) →
C 23 / W 4 / C 2 / W 2 / C 2 / W 4 / C 23 - R11: [9 sc, inc] × 6 (66) →
C 24 / W 5 / C 3 / W 2 / C 3 / W 5 / C 24
02. Cheek Mask & Brow Panels (Rounds 12–21)
- R12: 66 sc (66) →
C 22 / W 7 / C 3 / W 2 / C 3 / W 7 / C 22 - R13: 66 sc (66) →
C 21 / W 9 / C 6 / W 9 / C 21 - R14: 66 sc (66) →
C 20 / W 10 / C 6 / W 10 / C 20 - R15: 66 sc (66) →
C 19 / W 12 / C 4 / W 12 / C 19 - R16: 66 sc (66) →
C 18 / W 14 / C 2 / W 14 / C 18 - R17: 66 sc (66) →
C 18 / W 30 / C 18 - R18: 66 sc (66) →
C 17 / W 32 / C 17 - R19: 66 sc (66) →
C 17 / W 32 / C 17 - R20: 66 sc (66) →
C 18 / W 30 / C 18 - R21: 66 sc (66) →
C 19 / W 28 / C 19
Do NOT crochet closing rounds yet. With the lower head opening wide:
- Locate the line between Round 15 and Round 16.
- Insert the 1st blue safety eye into the gap after stitch 27.
- Insert the 2nd blue safety eye into the gap after stitch 39.
- This leaves exactly 12 stitch spaces between the eye stems, centered over the front blaze (gap after stitch 33).
- Pin the completed muzzle below the eyes (spanning R17–R23) to test expression balance. Once satisfied, press the locking washers firmly onto the eye stems from the inside.
03. Shape Lower Face & Close Underside (Rounds 22–31)
- R22: [9 sc, dec] × 6 (60) →
C 17 / W 26 / C 17 - R23: [8 sc, dec] × 6 (54) →
C 15 / W 24 / C 15 - R24: [7 sc, dec] × 6 (48) →
C 14 / W 20 / C 14— Add fiberfill into cheeks. - R25: [6 sc, dec] × 6 (42) →
C 12 / W 18 / C 12 - R26: [5 sc, dec] × 6 (36) →
C 10 / W 16 / C 10 - R27: [4 sc, dec] × 6 (30) →
C 9 / W 12 / C 9— Mark this 30-stitch round with 4 markers (sewing ring). - R28: [3 sc, dec] × 6 (24) →
C 8 / W 8 / C 8 - R29: [2 sc, dec] × 6 (18) →
C 18 - R30: [1 sc, dec] × 6 (12) →
C 12 - R31: [dec] × 6 (6) →
C 6
Cut yarn, thread needle through front loops of remaining 6 stitches, pull tight to close, and weave in ends.
Part 4: Pointed Triangular Ears (Make 2 Sets)
Husky ears are alert, upright, and cupped. Work each panel in turned rows from tip to base (ch 1 and turn after each row; turning chain does not count as a stitch).

Charcoal Outer Panel (Make 2):
- Row 1: Ch 2, sc in 2nd ch from hook, ch 1, turn. (1)
- Row 2: inc, ch 1, turn. (2)
- Row 3: inc in each st, ch 1, turn. (4)
- Row 4: inc, 2 sc, inc, ch 1, turn. (6)
- Row 5: inc, 4 sc, inc, ch 1, turn. (8)
- Row 6: 8 sc across, ch 1, turn. (8)
- Row 7: inc, 6 sc, inc, ch 1, turn. (10)
- Row 8: 10 sc across, ch 1, turn. (10)
- Row 9: inc, 8 sc, inc, ch 1, turn. (12)
- Row 10: 12 sc across, ch 1, turn. (12)
- Row 11: 12 sc across. (12) Fasten off leaving 35 cm tail.
White Inner Insert (Make 2):
- Row 1: Ch 2, sc in 2nd ch from hook, ch 1, turn. (1)
- Row 2: inc, ch 1, turn. (2)
- Row 3: inc in each st, ch 1, turn. (4)
- Row 4: inc, 2 sc, inc, ch 1, turn. (6)
- Row 5: 6 sc across, ch 1, turn. (6)
- Row 6: inc, 4 sc, inc, ch 1, turn. (8)
- Row 7: 8 sc across, ch 1, turn. (8)
- Row 8: 8 sc across. (8) Fasten off leaving sewing tail.
Part 5: Front Legs & Paws (Make 2, Rounds 1–26)
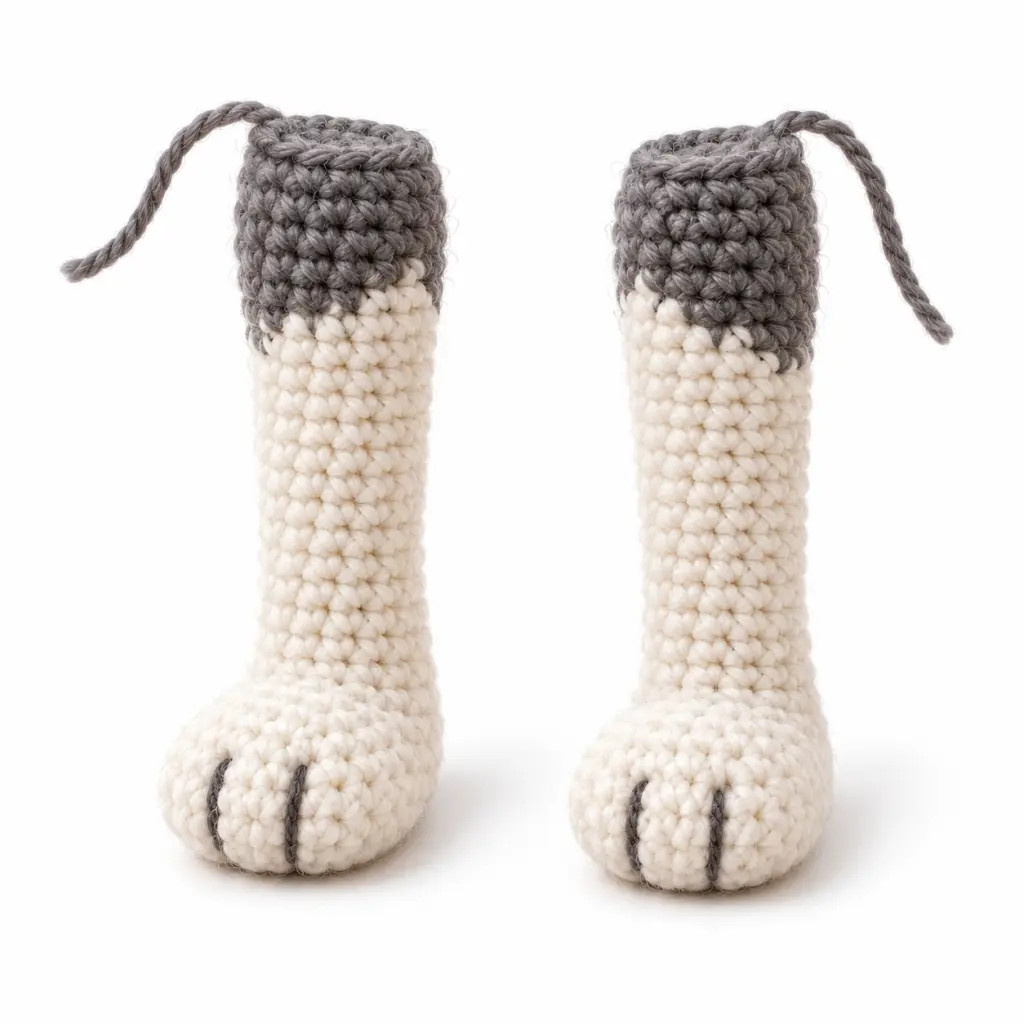
- R1: In White (W), 6 sc in MR. (6)
- R2: [inc] × 6. (12)
- R3: [1 sc, inc] × 6. (18)
- R4: [2 sc, inc] × 6. (24)
- R5: [3 sc, inc] × 6. (30)
- R6 (Sole Ridge): 30 sc in BLO (back loop only). (30)
- R7: 30 sc through both loops. (30)
- R8: [3 sc, dec] × 6. (24)
- R9: 24 sc even. (24)
- R10: [2 sc, dec] × 6. (18) — Stuff the paw firmly.
- R11–R21: 18 sc even in White. (18)
- R22: Switch to Medium Gray (G), 18 sc. (18)
- R23–R24: 18 sc even in Gray. (18)
- R25: [1 sc, dec] × 6 in Gray. (12)
- R26: 12 sc even in Gray. (12)
Fasten off leaving a 45 cm tail. Flatten the 12-stitch opening into 6 pairs of stitches; whipstitch flat.
Part 6: Hind Legs & Seated Thighs (Make 2)

Charcoal Thighs (Make 2, Rounds 1–17):
- R1: In Charcoal (C), 6 sc in MR. (6)
- R2: [inc] × 6. (12)
- R3: [1 sc, inc] × 6. (18)
- R4: [2 sc, inc] × 6. (24)
- R5: [3 sc, inc] × 6. (30)
- R6: [4 sc, inc] × 6. (36)
- R7–R11: 36 sc even across 5 rounds. (36)
- R12: [4 sc, dec] × 6. (30)
- R13: 30 sc even. (30)
- R14: [3 sc, dec] × 6. (24) — Add fiberfill into outer curve.
- R15: [2 sc, dec] × 6. (18)
- R16: [1 sc, dec] × 6. (12)
- R17: [dec] × 6. (6) — Close opening and weave in tail.
Rear White Paws (Make 2, Rounds 1–11):
- R1–R5: Work same as front paw in White up to 30 sc.
- R6: 30 sc in BLO. (30)
- R7–R8: 30 sc even. (30)
- R9: [3 sc, dec] × 6. (24)
- R10: [2 sc, dec] × 6. (18) — Stuff paw.
- R11: 18 sc even. (18)
Fasten off with 40 cm tail. Sew the 18-stitch rim of the rear paw to the lower front curve of the thigh (spanning thigh Rounds 5–10).
Part 7: Sickle Curled Tail (Rounds 1–32)

01. White Tip (Rounds 1–10)
- R1: In White (W), 6 sc in MR. (6) →
W 6 - R2: [inc] × 6. (12) →
W 12 - R3: [1 sc, inc] × 6. (18) →
W 18 - R4: [2 sc, inc] × 6. (24) →
W 24 - R5–R10: 24 sc even across 6 rounds. (24) →
W 24
02. Two-Tone Tube & Decreases (Rounds 11–32)
- R11–R20: 24 sc even across 10 rounds →
G 12 / C 12(24) — Add thin tufts of fiberfill; tube must remain flexible. - R21: [2 sc, dec] × 6 (18) →
G 9 / C 9 - R22–R27: 18 sc even across 6 rounds →
G 9 / C 9(18) - R28: [1 sc, dec] × 6 (12) →
G 6 / C 6 - R29–R32: 12 sc even across 4 rounds →
G 6 / C 6(12)
Fasten off with a 50 cm tail. Leave the 12-stitch base open.
Part 8: Comprehensive Step-by-Step Assembly

- Join Head to Body (Stitch-for-Stitch):
- Locate the 30 open rim stitches of Body Round 36.
- Locate the 30-stitch marked sewing ring at Head Round 27.
- Align both front center points at stitch 15 (matching the facial blaze with the white chest). Both seam joins go to the back.
- Use the 60 cm body tail to whipstitch each body rim stitch into the corresponding head surface stitch around all 30 pairs. Add a small final tuft of stuffing before completing the seam so the neck never wobbles.
- Attach the White Muzzle:
- Position the oval muzzle horizontally centered between and below the two safety eyes.
- Upper rim touches Head Round 17; lower rim reaches Head Round 23 (spanning approx. 10 head stitches wide).
- Distribute the 22 muzzle rim stitches evenly and whipstitch securely, adding a pinch of fiberfill before closing.
- Embroider Nose & Smiles:
- Using black yarn, embroider an upside-down triangle on the closed front of the muzzle (approx. 3 sc wide, 2 rounds high).
- Stitch a short vertical line down to the bottom of the muzzle, then two small curved smiles outward.
- Attach the Pointed Ears:
- Pin ear bases along Head Round 8 (48 sts): one ear across stitches 14–21, the other across stitches 28–35.
- Distribute the 12 ear-base stitches across the 8 head anchors as
2, 1, 2, 1, 2, 1, 2, 1. - Add two small anchor tacks behind each ear toward Round 6 to secure the alert outward angle.
- Attach Front Legs & Rear Thighs:
- Front Legs: Pin the flattened 6-pair top across Body Round 27 (stitches 14–19 and 24–29). Sew firmly, adding a stabilizing tack behind each upper leg near Body Round 23.
- Rear Thighs: Center inner thigh surfaces on Body Round 12 (stitches 15 and 46). Pin over Body Rounds 8–18 so the rear paws rest outside the front paws. Sew a secure oval seam around the contact area.
- Toe Lines: Embroider two vertical black toe lines (approx. 2 rounds high, 3 sc apart) on each white paw.
- Curl & Attach the Tail:
- Run a 60 cm length of gray yarn just under the inside Gray surface from Tail Round 7 to Round 29.
- Gently pull this gathering thread to draw the tube into a natural sickle curve. Anchor two hidden tacks (Tail R8 to R25, then R12 to R21).
- Sew the 12-stitch tail base across Body Rounds 9–12 centered over the back join. Add a small support tack from Tail Round 20 to Body Round 18 so the white tip rises gracefully beside the flank.
- Tabletop Stability Test: Place your puppy on a flat table and press gently. All four paws and the body base should rest firmly without rocking.
Frequently Asked Questions (FAQ)
Is this dog crochet pattern free for confident beginners?
Yes! While intermediate crocheters will breeze through it, confident beginners who know how to work a magic ring, single crochet, increases, and decreases can easily succeed. The round-by-round color charts eliminate all guesswork for the facial mask and chest.
What is the best yarn to use for amigurumi animals?
A smooth, Category 4 medium worsted weight acrylic (or 80/20 acrylic-cotton blend) is ideal. It holds crisp stitch definition, keeps stuffing hidden, is durable, and allows for clean color changes without snagging.
Can I substitute embroidered eyes for plastic safety eyes?
Yes. If you are gifting this toy to a baby, toddler, or pet who might chew on it, embroider the eyes using black and baby-blue cotton thread instead of using plastic safety eyes to eliminate any choking hazards.
Where can I download the printable 26-page PDF with step photos?
The complete 26-page visual booklet is available on Etsy. It includes high-resolution step photography for every single round, detailed embroidery diagrams, and translated editions in English, German, French, Spanish, and Italian. One purchase provides instant access to all files.
We Share Free Premium PDF Patterns Every Week!
Join our weekly subscriber list to get free, ad-free printable PDF crochet patterns delivered straight to your inbox every week. Enter your email below to get this week’s pattern now!
🔒 100% free forever. No spam, ever. Unsubscribe with 1-click anytime.


