- Home
- Patterns
- Home & Decor
- Free Crochet Baby Grinch Pattern: Baby Grinch & Max the Dog Amigurumi Duo
Crochet Pattern & Guide · For home & decor
Free Crochet Baby Grinch Pattern: Baby Grinch & Max the Dog Amigurumi Duo
Complete 30-page PDF pattern guide for Baby Grinch & Max the Dog 15-inch Christmas amigurumi duo.
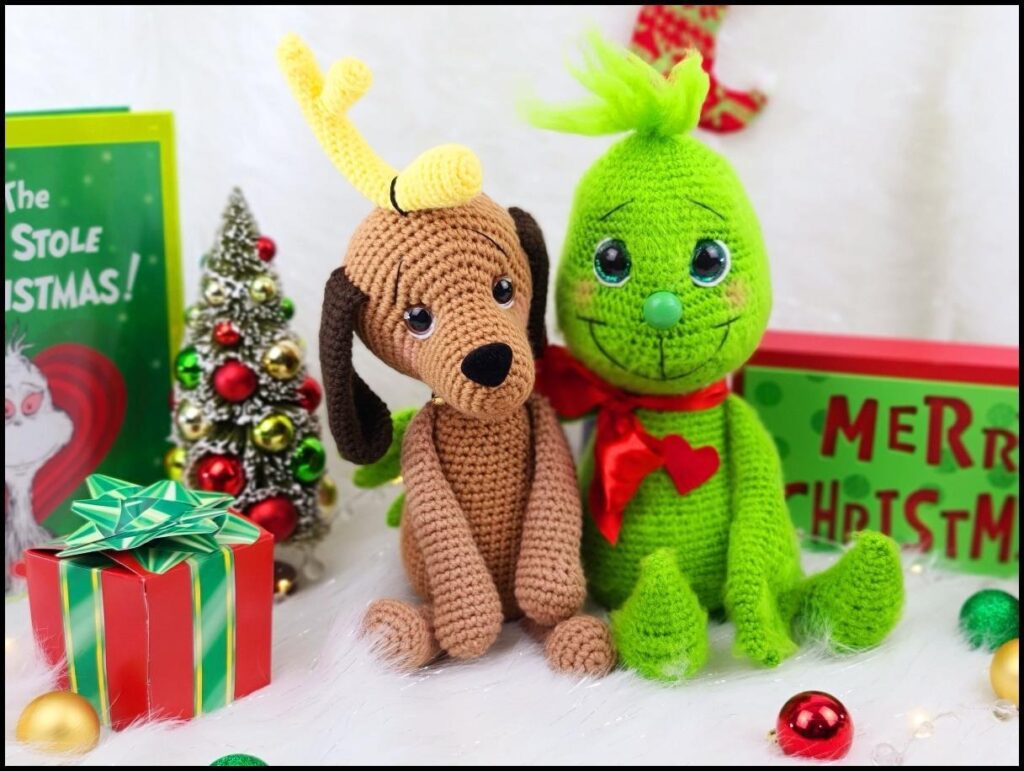
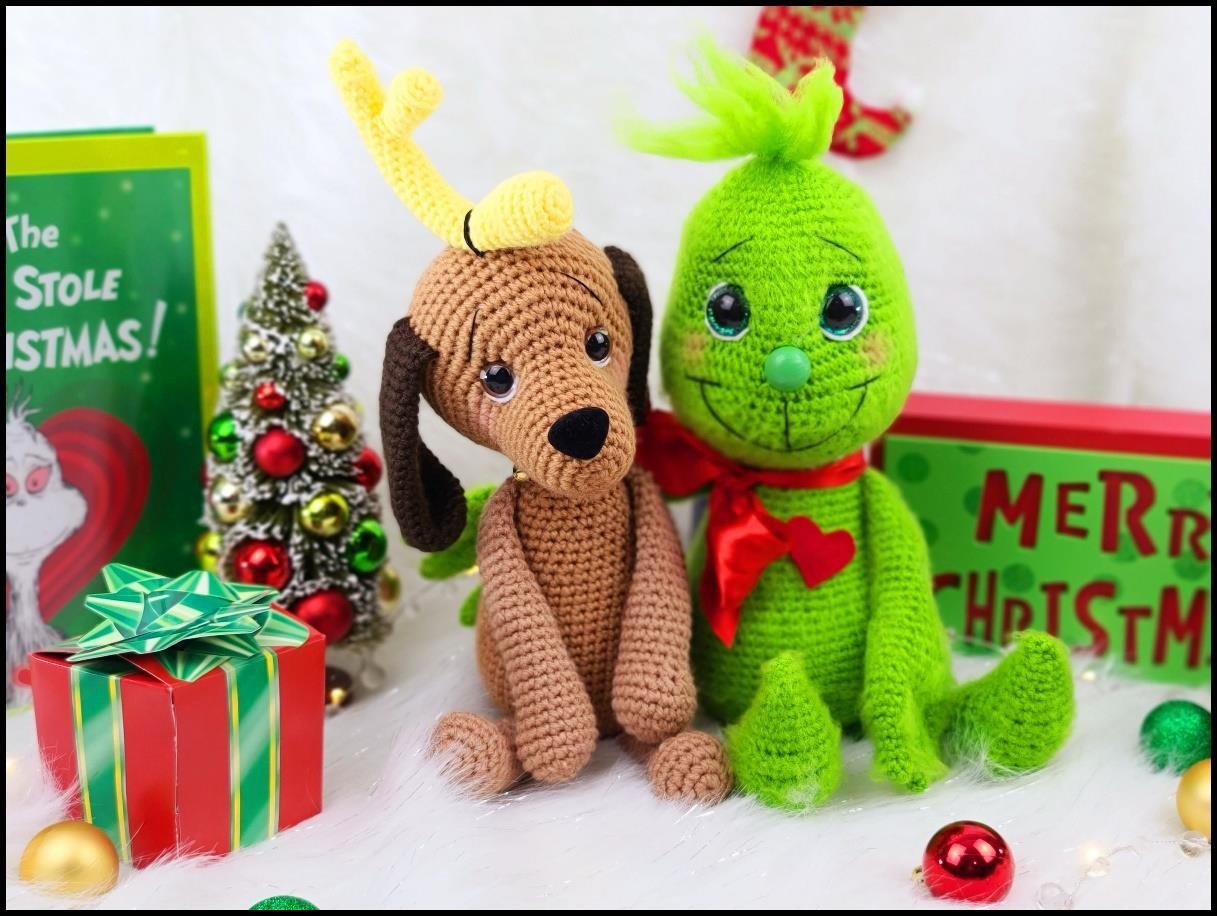
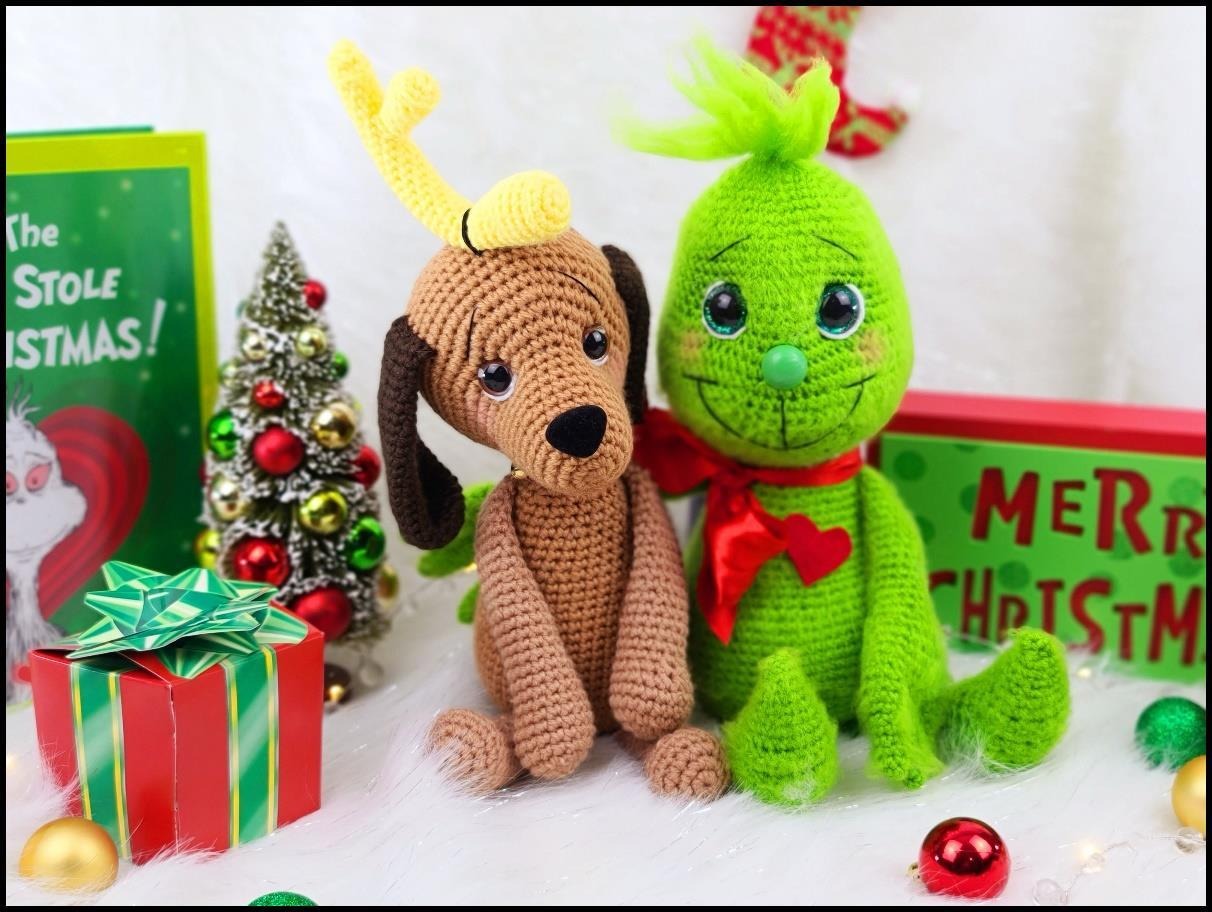
Celebrate Whoville holiday charm with this complete free crochet Baby Grinch and Max the Dog pattern! This festive 2-in-1 amigurumi duo brings together the endearing 15-inch Baby Grinch (featuring sculpted chubby cheeks, a fuzzy green forelock, and a red felt heart collar that is three sizes too small) and his loyal companion Baby Max the Reindeer Dog (with soft floppy ears, an expressive puppy face, and his iconic single tied yellow reindeer antler). Perfect as Christmas fireplace mantel decor, tree skirt companions, or cherished holiday handmade gifts!
🐾 Holiday Keepsake & Pet-Friendly Crafting Notes
Pet & Child Safety Tips: While Baby Grinch and Max look adorable posing beside family pets near the Christmas tree, remember:
• Embroidered Eyes for Pet Homes: If your amigurumi will sit within reach of curious puppies or playful cats, substitute plastic safety eyes with embroidered French knots or sewn felt circles using black cotton embroidery floss.
• Firm Hypoallergenic Stuffing: Pack limbs and body firmly with dense polyester fiberfill to preserve shape when displayed on mantels and holiday shelves.
• Secure Antler Ties: For Max’s reindeer antler, wrap the thread securely around the base and knot firmly so pets cannot pull loose loops.
15 inches (38 cm) each
Intermediate / Adventurous Beginner
US D/3 (3.25 mm)
Worsted Weight #4 (100g Main, 50-75g Accent)
Materials & Tools Required
- Worsted Weight #4 Yarn:
- Baby Grinch: ~100 g Bright Lime Green (Main Color A), plus small scrap of white yarn for eye highlights.
- Baby Max: ~100 g Warm Caramel Brown (Color A), ~50 g Dark Coffee Brown (Color B – Ears), ~20 g Buttercup Yellow (Color C – Antler), and ~15 g Festive Red (Color D – Collar).
- Crochet Hook: 3.25 mm (US D/3)
- Safety Eyes & Noses:
- Baby Grinch: One pair of 24 mm safety eyes (painted lime green or clear) and one 21 mm safety nose (or follow our crochet nose pattern below).
- Baby Max: One pair of 18 mm black safety eyes and one 26 mm black dog safety nose.
- Notions: High-grade polyester fiberfill stuffing, tapestry/yarn needle, stitch markers, black cotton embroidery floss, craft jewelry wire (optional, for bendable antler), small red felt heart, 5 mini jingle bells (optional, for Max’s collar), wire pet slicker brush (optional, for brushing Grinch’s fuzzy hair tuft).
Part 1: Baby Grinch Crochet Pattern (15 inches)
Crochet Nose (Optional Alternative to 21 mm Safety Nose)
Using green yarn:
- Round 1: Make 6 sc into a magic ring. [6]
- Round 2: Inc in each st around. [12]
- Round 3: Sc in each st around. [12]
- Round 4: Dec × 6. [6]
Fasten off, leaving a long tail for sewing. Stuff the nose lightly.
Baby Grinch Head & Body (Worked Top to Bottom in Lime Green)
Worked continuously in spirals without joining:
- Round 1: Make 6 sc into a magic ring. [6]
- Round 2: Inc in each st around. [12]
- Round 3: (1 sc, inc) × 6. [18]
- Round 4: (2 sc, inc) × 6. [24]
- Round 5: Sc in each st around. [24]
- Round 6: (3 sc, inc) × 6. [30]
- Round 7: (4 sc, inc) × 6. [36]
- Round 8: (5 sc, inc) × 6. [42]
- Round 9: (6 sc, inc) × 6. [48]
- Rounds 10 – 16 (7 rounds): Sc in each st around. [48]
- Round 17 (Cheek Shaping Starts): (inc, 7 sc) × 6. [54]
- Round 18: Inc × 3, 32 sc, inc × 3, 16 sc. [60]
(Tip: Place a stitch marker on the 1st increase and last increase of this round to guide eye placement). - Round 19: (inc, 9 sc) × 6. [66]
- Rounds 20 – 21 (2 rounds): Sc in each st around. [66]
- Round 22: (dec, 9 sc) × 6. [60]
- Round 23: Sc in each st around. [60]
- Round 24: (dec, 8 sc) × 6. [54]
- Round 25: (dec, 7 sc) × 6. [48]
- Round 26: Sc in each st around. [48]
- Round 27: (dec, 6 sc) × 6. [42]
- Round 28: Sc in each st around. [42]
- Round 29: Dec × 3, 21 sc, dec × 3, 9 sc. [36]
Eye Placement & Sculpting: Place safety eyes between Rounds 16 and 17. Position the 1st eye 1 hole before your 1st increase marker from Round 18. Count 11 holes across and place the 2nd eye after the last increase. Stuff the head firmly. To create expressive sunken eye sockets, thread green yarn through each eye hole back and forth across 3 times, pulling gently, before securing the washer backs inside. Center the nose between the eyes.
- Round 30: (dec, 4 sc) × 6. [30]
- Round 31: (dec, 3 sc) × 6. [24]
- Rounds 32 – 34 (3 rounds): Sc in each st around. [24]
- Round 35: (3 sc, inc) × 6. [30]
- Round 36: (4 sc, inc) × 6. [36]
- Rounds 37 – 39 (3 rounds): Sc in each st around. [36]
- Round 40: (5 sc, inc) × 6. [42]
- Rounds 41 – 42 (2 rounds): Sc in each st around. [42]
- Round 43: (6 sc, inc) × 6. [48]
- Rounds 44 – 45 (2 rounds): Sc in each st around. [48]
- Round 46: (7 sc, inc) × 6. [54]
- Round 47: Sc in each st around. [54]
- Round 48 (Tummy Expansion): (inc, sc) × 2, 42 sc, (inc, sc) × 4. [60]
- Rounds 49 – 56 (8 rounds): Sc in each st around. [60]
- Round 57: (dec, 8 sc) × 6. [54]
- Round 58: Sc in each st around. [54]
- Round 59: (7 sc, dec) × 6. [48]
- Round 60: (6 sc, dec) × 6. [42]
- Round 61: (5 sc, dec) × 6. [36]
- Round 62: (4 sc, dec) × 6. [30]
- Round 63: (3 sc, dec) × 6. [24]
- Round 64: (2 sc, dec) × 6. [18]
- Round 65: (1 sc, dec) × 6. [12]
- Round 66: Dec × 6. [6]
Fasten off, weave tail through remaining 6 loops, pull tight to close hole, and secure end inside.
Baby Grinch Legs (Make 2 in Lime Green)
- Round 1: Make 4 sc into a magic ring. [4]
- Round 2: Inc, 1 sc, dec. [4]
- Round 3: Inc × 2, 2 sc. [6]
- Round 4: Inc × 2, 4 sc. [8]
- Round 5: Inc × 2, 6 sc. [10]
- Round 6: Inc × 2, 8 sc. [12]
- Round 7: Sc in each st around. [12]
- Round 8: (1 sc, inc) × 6. [18]
- Round 9: Sc in each st around, then work an additional 6 sc to shift the starting point. [18]
Turn for Heel Shaping (worked in back-and-forth rows):
- Row 10: Ch 1, turn, work 16 sc across. [16]
- Row 11: Ch 1, turn, sc across. [16]
- Row 12: Ch 1, turn, 6 sc, dec × 2, 6 sc. [14]
- Row 13: Ch 1, turn, dec, 3 sc, 4 hdc, 3 sc, dec. [12]
- Row 14: Ch 1, turn, dec, 3 sc, 2 hdc, 3 sc, dec. [10]
- Row 15: Ch 1, turn, dec, 6 sc, dec. [8]
- Row 16: Ch 1, turn, dec, 4 sc, dec. [6]
Resume Working in the Round for Ankle & Leg:
- Round 17: Ch 1, turn, work 6 sc across top, 6 sc up side of foot, 3 sc across front edge, 6 sc down other side of foot. [21]
- Round 18: Sc in each st around. [21]
- Round 19: (5 sc, dec) × 3. [18]
- Round 20: (4 sc, dec) × 3. [15]
Start stuffing the foot and lower ankle firmly:
- Rounds 21 – 24 (4 rounds): Sc in each st around. [15]
- Round 25: Dec, 13 sc. [14]
- Rounds 26 – 28 (3 rounds): Sc in each st around. [14]
- Round 29: Dec, 12 sc. [13]
Stop stuffing the leg now so the upper leg remains soft and flexible for sitting:
- Rounds 30 – 31 (2 rounds): Sc in each st around. [13]
- Round 32: Dec, 11 sc. [12]
Fasten off, leaving a long tail for sewing.
Baby Grinch Arms & Hands (Make 2 in Lime Green)
Fingers (Make 3 per arm):
- Round 1: Make 4 sc into a magic ring. [4]
- Round 2: Sc in each st around. [4]
- Round 3: (inc, 1 sc) × 2. [6]
- Rounds 4 – 6 (3 rounds): Sc in each st around. [6]
- Round 7: (inc, 2 sc) × 2. [8]
- Rounds 8 – 9 (2 rounds): Sc in each st around. [8]
Do not stuff the fingers. Fasten off the 1st and 2nd fingers, but do not fasten off the 3rd finger (continue directly to joining):
Joining Fingers to Form Hand & Arm:
- Round 1: Work 1 sc on 2nd finger to join, 3 more sc across 2nd finger; work 1 sc on 1st finger to join, 7 sc on 1st finger; work 4 sc across back of 2nd finger; work 8 sc around 3rd finger. [24]
- Round 2: (6 sc, dec) × 3. [21]
- Round 3: (5 sc, dec) × 3. [18]
- Rounds 4 – 5 (2 rounds): Sc in each st around. [18]
- Round 6: (4 sc, dec) × 3. [15]
- Round 7: (3 sc, dec) × 3. [12]
- Rounds 8 – 12 (5 rounds): Sc in each st around. [12]
Stuff the hand firmly:
- Round 13: Dec, 10 sc. [11]
- Rounds 14 – 17 (4 rounds): Sc in each st around. [11]
Stop stuffing the arm:
- Round 18: Dec, 9 sc. [10]
- Rounds 19 – 22 (4 rounds): Sc in each st around. [10]
Work 2 sc to reach side seam. Flatten arm top in half and sc the opening closed through both thicknesses. Fasten off leaving a long sewing tail.
Baby Grinch Finishing Touches: Hair Tuft & Felt Heart
- Green Forelock: Cut 12 strands of green yarn (approx. 8 inches long). Insert crochet hook into the crown of the head, fold strands in half, pull through and knot securely. Lightly brush with a wire pet brush to fluff out, trim neatly, and twist into 4 whimsical tufts.
- Face Embroidery: With white yarn, add subtle curved highlight stitches along the lower outer edges of each eye. With black embroidery floss, stitch curved smile creases on each cheek, a wide sly smile across Rounds 20–21, and tilted mischievous eyebrows.
- Red Heart: Cut a 2-inch heart from red felt. Sew or glue onto the left chest.
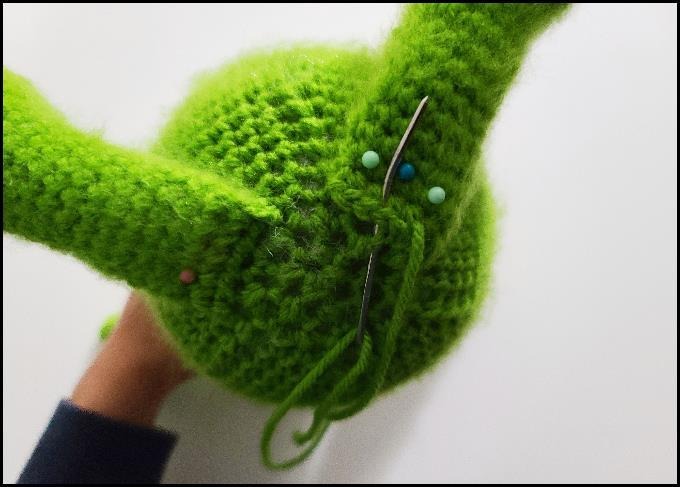
- Assembly: Pin arms at a forward angle between Rounds 32 and 36; sew securely. Turn body upside down, pin legs between Rounds 5 and 6 of body bottom, and sew firmly so Grinch sits upright with ease.
Part 2: Baby Max the Reindeer Dog Crochet Pattern
1. Head (Worked Front of Snout to Back in Color A – Warm Caramel Brown)
- Round 1: Make 6 sc into a magic ring. [6]
- Round 2: Inc in each st around. [12]
- Round 3: (1 sc, inc) × 6. [18]
- Round 4: (2 sc, inc) × 6. [24]
- Rounds 5 – 7 (3 rounds): Sc in each st around. [24]
- Round 8: (3 sc, inc) × 6. [30]
- Rounds 9 – 12 (4 rounds): Sc in each st around. [30]
- Round 13 (Forehead Expansion): (2 sc, inc) × 6, 12 sc. [36]
- Round 14: (3 sc, inc) × 6, 12 sc. [42]
- Round 15: (4 sc, inc) × 6, 12 sc. [48]
- Round 16: (5 sc, inc) × 6, 12 sc. [54]
Nose & Eye Placement: Insert the 26 mm dog safety nose between Rounds 4 and 5, centered horizontally. Insert 18 mm safety eyes between Rounds 14 and 15, leaving 13 holes between them (place the 1st eye before the 2nd increase, count 13 holes, then place 2nd eye). Do not snap the safety backings until after socket indentations on Round 25.
- Rounds 17 – 22 (6 rounds): Sc in each st around. [54]
- Round 23: (7 sc, dec) × 6. [48]
- Round 24: (6 sc, dec) × 6. [42]
- Round 25: (5 sc, dec) × 6. [36]
Eye Sockets: Stuff head firmly. Thread yarn through eye openings back and forth 3 times pulling gently to indent the sockets. Place the washer backings on the safety eyes, then add extra stuffing to fill the snout firmly.
- Round 26: (4 sc, dec) × 6. [30]
- Round 27: (3 sc, dec) × 6. [24]
- Round 28: (2 sc, dec) × 6. [18]
- Round 29: (1 sc, dec) × 6. [12]
- Round 30: Dec × 6. [6]
Fasten off, weave tail through last 6 stitches, pull tight to close, and bury the yarn tail.
2. Body (Color A – Warm Caramel Brown)
- Round 1: Make 6 sc into a magic ring. [6]
- Round 2: Inc in each st around. [12]
- Round 3: (1 sc, inc) × 6. [18]
- Round 4: (2 sc, inc) × 6. [24]
- Round 5: (3 sc, inc) × 6. [30]
- Round 6: (4 sc, inc) × 6. [36]
- Round 7: (5 sc, inc) × 6. [42]
- Round 8: (6 sc, inc) × 6. [48]
- Rounds 9 – 16 (8 rounds): Sc in each st around. [48]
- Round 17: Dec × 3, 18 sc, dec × 3, 18 sc. [42]
- Rounds 18 – 20 (3 rounds): Sc in each st around. [42]
- Round 21: (5 sc, dec) × 6. [36]
Start stuffing the body firmly:
- Rounds 22 – 24 (3 rounds): Sc in each st around. [36]
- Round 25: (4 sc, dec) × 6. [30]
- Rounds 26 – 27 (2 rounds): Sc in each st around. [30]
- Round 28: (3 sc, dec) × 6. [24]
- Rounds 29 – 30 (2 rounds): Sc in each st around. [24]
- Round 31: (2 sc, dec) × 6. [18]
- Round 32: (4 sc, dec) × 3. [15]
- Rounds 33 – 35 (3 rounds): Sc in each st around. [15]
Fasten off, leaving a long tail for sewing to the head.
3. Front Arms / Legs (Make 2 in Color A – Warm Caramel Brown)
- Round 1: Make 6 sc into a magic ring. [6]
- Round 2: Inc in each st around. [12]
- Round 3: (1 sc, inc) × 6. [18]
- Rounds 4 – 5 (2 rounds): Sc in each st around. [18]
- Round 6: 7 sc, dec × 2, 7 sc. [16]
- Round 7: 6 sc, dec × 2, 6 sc. [14]
- Rounds 8 – 11 (4 rounds): Sc in each st around. [14]
Stuff the front paw firmly:
- Round 12: Dec, 12 sc. [13]
- Rounds 13 – 15 (3 rounds): Sc in each st around. [13]
Stop stuffing the arm:
- Round 16: Dec, 11 sc. [12]
- Rounds 17 – 19 (3 rounds): Sc in each st around. [12]
- Round 20: Dec, 10 sc. [11]
- Rounds 21 – 23 (3 rounds): Sc in each st around. [11]
- Round 24: Dec, 9 sc. [10]
- Rounds 25 – 27 (3 rounds): Sc in each st around. [10]
Fasten off, leaving a long tail for sewing.
4. Hind Legs (Make 2 in Color A – Warm Caramel Brown)
- Round 1: Make 6 sc into a magic ring. [6]
- Round 2: Inc in each st around. [12]
- Round 3: (1 sc, inc) × 6. [18]
- Rounds 4 – 5 (2 rounds): Sc in each st around. [18]
- Round 6: 7 sc, dec × 2, 7 sc. [16]
- Round 7: 6 sc, dec × 2, 6 sc. [14]
- Rounds 8 – 10 (3 rounds): Sc in each st around. [14]
Stuff paw firmly:
- Round 11: Dec, 12 sc. [13]
- Rounds 12 – 14 (3 rounds): Sc in each st around. [13]
Stop stuffing the leg:
- Round 15: Dec, 11 sc. [12]
- Rounds 16 – 18 (3 rounds): Sc in each st around. [12]
- Round 19: (4 sc, dec) × 2. [10]
- Round 20: Sc in each st around. [10]
Fasten off, leaving a long tail for sewing.
5. Floppy Ears (Make 2 in Color B – Dark Coffee Brown)
- Round 1: Make 6 sc into a magic ring. [6]
- Round 2: Inc in each st around. [12]
- Round 3: (1 sc, inc) × 6. [18]
- Round 4: (2 sc, inc) × 6. [24]
- Rounds 5 – 7 (3 rounds): Sc in each st around. [24]
- Round 8: (dec, 10 sc) × 2. [22]
- Rounds 9 – 10 (2 rounds): Sc in each st around. [22]
- Round 11: (dec, 9 sc) × 2. [20]
- Rounds 12 – 13 (2 rounds): Sc in each st around. [20]
- Round 14: (dec, 8 sc) × 2. [18]
- Rounds 15 – 16 (2 rounds): Sc in each st around. [18]
- Round 17: (dec, 7 sc) × 2. [16]
- Round 18: Sc in each st around. [16]
- Round 19: (dec, 6 sc) × 2. [14]
- Round 20: Sc in each st around. [14]
- Round 21: (dec, 5 sc) × 2. [12]
- Round 22: Sc in each st around. [12]
- Round 23: (dec, 4 sc) × 2. [10]
- Round 24: Sc in each st around. [10]
Do not stuff the ears. Flatten ear in half and sc the opening closed through both thicknesses. Fasten off leaving a long tail for sewing.
6. Puppy Tail (Color A – Warm Caramel Brown)
- Round 1: Make 6 sc into a magic ring. [6]
- Rounds 2 – 3 (2 rounds): Sc in each st around. [6]
- Round 4: (1 sc, inc) × 3. [9]
- Rounds 5 – 6 (2 rounds): Sc in each st around. [9]
Stuff tail lightly as you work:
- Round 7: (2 sc, inc) × 3. [12]
- Rounds 8 – 9 (2 rounds): Sc in each st around. [12]
- Round 10: (3 sc, inc) × 3. [15]
- Rounds 11 – 15 (5 rounds): Sc in each st around. [15]
Fasten off, leaving a long tail for sewing.
7. Reindeer Antler & Branch (Color C – Buttercup Yellow)
Big Main Antler:
- Round 1: Make 6 sc into a magic ring. [6]
- Round 2: Inc in each st around. [12]
- Round 3: (3 sc, inc) × 3. [15]
- Round 4: In BLO, sc in each st around. [15]
- Rounds 5 – 7 (3 rounds): Sc in each st around. [15]
Stuff base lightly:
- Round 8: (3 sc, dec) × 3. [12]
- Rounds 9 – 10 (2 rounds): Sc in each st around. [12]
- Round 11: (1 sc, dec) × 3. [9]
- Rounds 12 – 14 (3 rounds): Sc in each st around. [9]
- Rounds 15 – 33 (19 rounds): Sc in each st around. [9]
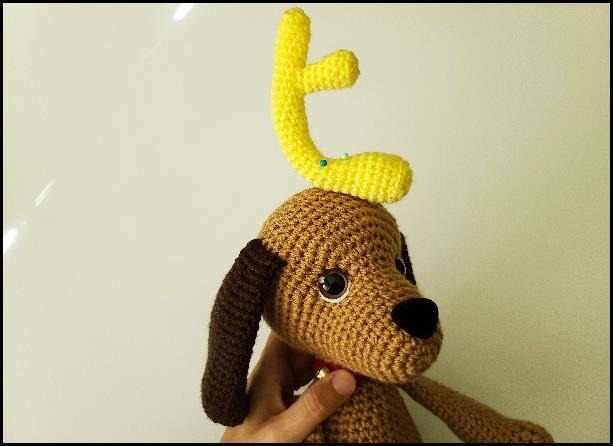
(Optional Wire Insert): Cut a 10-inch piece of jewelry/craft wire, fold in half, and slide into the antler to give Max’s horn a charming forward bend.
- Round 34: In BLO, sc in each st around. [9]
- Round 35: (1 sc, dec) × 3. [6]
Fasten off and sew the opening closed.
Small Antler Branch:
- Round 1: Make 6 sc into a magic ring. [6]
- Round 2: (1 sc, inc) × 3. [9]
- Round 3: In BLO, sc in each st around. [9]
- Round 4: Sc in each st around. [9]
- Round 5: Dec, 7 sc. [8]
- Round 6: Sc in each st around. [8]
- Round 7: Dec, 6 sc. [7]
- Round 8: Sc in each st around. [7]
Fasten off leaving a tail. Sew the small branch onto the side of the big antler about 2 inches from the top.
8. Red Puppy Collar (Color D – Festive Red)
- With Festive Red yarn, ch 22.
- Row 1: Hdc in 2nd ch from hook and each ch across. [21 hdc]
Fasten off leaving a long tail. Sew around neck and stitch 5 mini jingle bells evenly spaced around the collar band.
9. Assembly & The Iconic Tied Horn
- Head & Body: Pin the head securely onto the body neck opening, add extra stuffing to prevent wobbling, and sew around with firm stitches.
- Collar: Wrap the red collar around the neck and stitch the ends closed.
- Arms (Front Legs): Pin to upper chest right underneath the collar, angled slightly inward; sew securely.
- Hind Legs: Pin legs between Rounds 5 and 6 of body bottom so Max sits firmly and balanced.
- Tail: Pin and sew to the back between Rounds 9 and 14.
- Floppy Ears: Pin ears to sides of the head between Rounds 21 and 25, angled slightly forward and downward; sew in place.
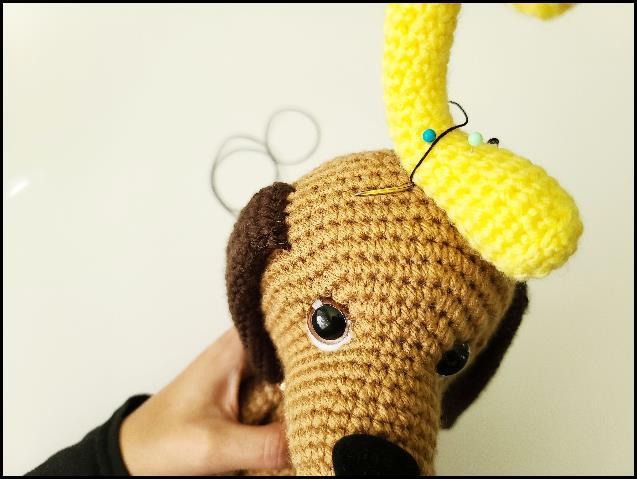
- Tying the Reindeer Horn: Pin the assembled yellow antler to the crown of Max’s head between the ears. Thread a long strand of black embroidery thread or red string, insert into the head, and wrap snugly around the base of the antler approximately 15 times before anchoring with a secure knot. This recreates Max’s famous tied horn look from the classic story!
- Eyebrows: With black thread, embroider gentle slanted puppy eyebrows above each eye for Max’s sweet, loyal expression.
🎉 Your Whoville Holiday Duo is Complete!
Congratulations! Your handmade Baby Grinch & Max the Dog are ready to bring holiday cheer to your mantel, Christmas tree, and holiday guests. Share your completed projects with the #PetsYarn community on Pinterest and Instagram!
We Share Free Premium PDF Patterns Every Week!
Join our weekly subscriber list to get free, ad-free printable PDF crochet patterns delivered straight to your inbox every week. Enter your email below to get this week’s pattern now!
🔒 100% free forever. No spam, ever. Unsubscribe with 1-click anytime.